

A steering wheel shake at highway speeds, a brake pedal that pulses under your foot, or a sharp grinding sound at a stoplight can all point to brake rotor trouble. Knowing how to inspect brake rotors helps you catch visible wear early, understand what your vehicle may need, and avoid putting off a safety-critical repair.
Rotors are the metal discs clamped by your brake pads to slow the wheels. They handle intense heat, pressure, road salt, water, and daily stop-and-go driving. Some surface rust after rain is normal. Deep grooves, cracking, serious corrosion, or a rotor below its safe thickness are not.
Start With Safety and the Right Tools
A basic visual inspection can be done through the wheel openings on some vehicles, but a complete inspection requires removing the wheel. Park on level ground, set the parking brake if you are inspecting the front brakes, and secure the vehicle with wheel chocks. Loosen lug nuts only while the tire is on the ground.
Raise the vehicle at its designated lift point and support it with properly rated jack stands. Never place any part of your body under a vehicle supported only by a hydraulic jack. Once the wheel is off, keep the lug nuts together and inspect one corner at a time.
For a visual check, you need a bright flashlight and a clean rag. For a more accurate inspection, use a brake rotor micrometer, not a tape measure or standard caliper. A dial indicator is needed to measure rotor runout, which is side-to-side movement as the rotor turns. If you are not equipped to make these measurements, a professional brake inspection is the safer choice.
How to Inspect Brake Rotors Visually
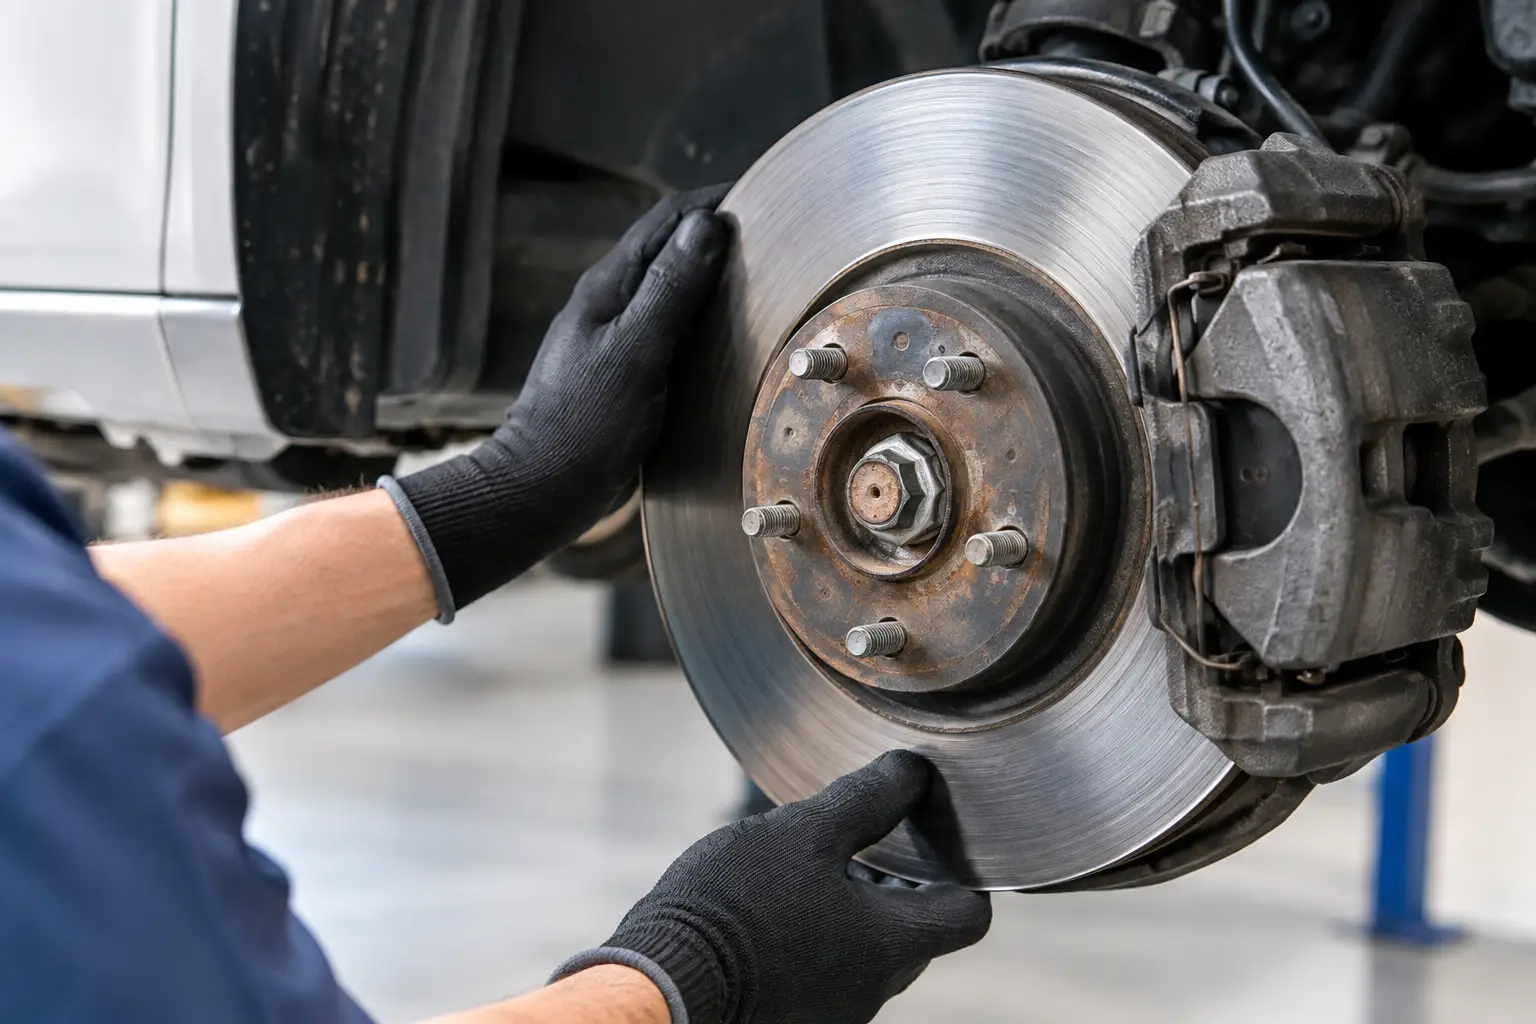
Look at both braking surfaces of the rotor, not just the outer face that is easiest to see. The inner surface often wears differently, especially when a caliper slide is sticking or a pad is not moving freely. Turn the rotor by hand and shine your light across its face at an angle. This makes damage easier to spot.
A healthy rotor should have a relatively smooth, even surface. Fine circular lines from normal pad contact are common. What matters is the depth and severity of any marks.
Check for scoring and grooves
Deep grooves or ridges mean the pad material has worn unevenly or the brake pad may have reached its metal backing plate. Run a fingertip gently across the surface after the brakes have cooled. If grooves are easy to feel, the rotor should be measured and assessed before new pads are installed.
Installing fresh pads on heavily scored rotors can reduce braking performance, create noise, and cause the new pads to wear unevenly. Depending on the rotor thickness and condition, the solution may be resurfacing or replacement. Many modern rotors do not have enough extra material to machine safely, so replacement is often the better long-term value.
Look for heat damage and cracking
Blue, purple, or dark patches can indicate excessive heat. A single heat mark does not automatically mean the rotor has failed, but it deserves attention. Repeated hard braking, towing, driving down long grades, a sticking caliper, or seized slide pins can overheat a rotor.
Look closely for cracks, especially near drilled holes on performance rotors, around the hub area, and along the braking surface. Hairline heat checking may be visible on severely overheated rotors, while larger cracks are a clear reason to replace the rotor. Do not continue driving with a cracked brake rotor.
Check the outer edge and rust condition
Most rotors develop a small lip near the outer edge as the friction surface wears down. A minor lip is normal. A pronounced ridge, however, can make noise, affect pad contact, and signal that the rotor is nearing its discard thickness.
In areas with wet winters and road salt, rust can become more than cosmetic. Light orange surface rust usually clears after several normal stops. Heavy scaling, pitting, flakes around the outer edge, or corrosion that reduces the usable braking surface can weaken the rotor and interfere with smooth braking. The inner rotor face is especially vulnerable because it is harder to see during routine checks.
Measure Rotor Thickness Before Making a Decision
Appearance alone cannot tell you whether a rotor is safe to reuse. Every rotor has a minimum discard thickness, often stamped on the rotor hat or listed in the vehicle manufacturer’s service information. This number is different from the thickness of a new rotor.
Use a rotor micrometer to measure the disc about 3/8 inch in from the outer edge, avoiding any rust lip. Take measurements at six to eight evenly spaced points around the rotor. Write them down rather than relying on a single reading.
If the thinnest point is at or below the minimum thickness, replace the rotor. Do not assume a rotor that measures barely above minimum is a good candidate for resurfacing. Machining removes material, and the rotor must remain above the discard specification after the work is done.
Also compare the readings with one another. Significant variation in thickness around the rotor can cause brake pedal pulsation and uneven pad deposits. A technician may refer to this as disc thickness variation. Drivers often call the feeling “warped rotors,” but the cause is not always a rotor that has physically bent.
Understand Pulsation, Runout, and Pad Deposits
A pulsing brake pedal or steering wheel vibration when braking is a reason to inspect the whole brake system. Rotor thickness variation is a common cause, but it can develop because of uneven pad transfer, improper lug-nut torque, corrosion between the rotor and hub, or excessive rotor runout.
Runout means the rotor does not rotate perfectly true. It is measured with a dial indicator mounted securely near the rotor face. Even a small amount beyond the vehicle specification can contribute to uneven deposits and future pulsation. Before measuring, the hub and rotor mounting surfaces must be clean, and the rotor should be held in place with lug nuts tightened evenly.
This is one area where a visual inspection has limits. A rotor may look smooth yet still have a measurement issue. Conversely, a rotor with visible discoloration may be serviceable if it is within thickness specifications and the underlying brake components are working correctly. Accurate measurements prevent unnecessary parts replacement.
Inspect the Parts Around the Rotor
A rotor problem is often a symptom, not the root cause. Check the brake pads for uneven wear. If one pad is much thinner than its mate on the same wheel, the caliper piston, slide pins, pad hardware, or bracket may not be moving as designed.
Inspect the caliper for fluid leaks and examine the brake hose for cracks, swelling, or damage. Make sure pad clips and hardware are installed correctly. A seized caliper can overheat a new rotor quickly, while corroded hub surfaces can prevent a new rotor from sitting flat.
Pay attention to how the vehicle drives as well. Pulling to one side under braking, a burning smell after a short trip, reduced stopping power, or a wheel that feels unusually hot are not wait-and-see concerns. Have the vehicle checked promptly.
When to Replace Brake Rotors
Replace rotors when they are below minimum thickness, cracked, severely rusted or pitted, deeply grooved, or affected by excessive thickness variation. Rotors are commonly replaced in pairs on the same axle so both sides brake evenly. New pads are usually installed at the same time, since worn pads may not bed properly against a new rotor surface.
There is a trade-off between machining and replacement. Resurfacing can be appropriate when a rotor has enough material, is free of serious heat damage, and can be machined within specification. Replacement can be more practical when labor costs are close to the price of quality new rotors, particularly on vehicles used for commuting, delivery work, towing, or frequent city driving.
After any brake work, proper break-in matters. Follow the pad and rotor manufacturer’s bedding procedure, avoid repeated hard stops until the parts have seated, and make sure lug nuts are tightened to the vehicle’s specified torque. Over-tightening with an impact wrench can contribute to rotor-related vibration.
For everyday drivers, checking rotor condition during tire rotations, seasonal tire changes, or brake pad service is a smart habit. If you see deep damage, measure near the service limit, or feel a change in braking, JAK Tire Service can provide a precise brake inspection and clear recommendations. Your brakes should feel predictable every time you press the pedal, whether you are headed across town or carrying the people and cargo that matter most.